Finished onboarding and not sure how to make the app fit your actual life? Let's set up one person's full scenario, start to finish: salary, loans, debts, savings for the kids, and a work food app full of gift cards.
Someone emailed us asking how to set the app up around their real life. This post walks through the whole setup, one feature at a time:
- Book: the container everything lives in. Its type and schedule decide how balances and budgeting periods work.
- Accounts: the money you spend from day to day, like a checking account or a credit card.
- Trackers: savings pots and loans. They show progress toward a goal, and money moves in and out by transfer.
- Categories, budgets, and goals: how spending is grouped, and the monthly limits and targets you put on each group.
- Recurring transactions and transfers: regular income and payments, set up once so the plan runs itself.
- Tags: labels you can search and total by, across any account or category. They're how we'll track the gift cards.
Work through the steps in order and swap in your own numbers.
Recently someone emailed us asking for guidance. We asked what they were working with, and the reply opened with “just going to spitball all of my different finances, and would love to know how to configure everything”, followed by a real-life example laid out in bullet points. It's the best kind of email, and their situation touches nearly every feature in the app, so rather than answer it privately I'm answering it here, for everyone.
Here's what we're working with:
- A monthly salary.
- Loan payments, a few debts to friends, and debt to government agencies.
- A food app from work: a monthly allowance that resets each month (no rollover), spent on gift cards they then use for clothes, appliances, electronics, and so on. They wanted to see both numbers: what's left in the app this month, and the combined balance across the cards, which doesn't reset. (The cards expire after a year, but that didn't need tracking.)
- Subscriptions.
- An adjustable monthly spending plan covering savings (for them and their kids), travel, rainy-day money (maybe just whatever's left over), loan and debt payments, gas, groceries, and eating out and entertainment.
And here's where they wanted guidance once it's running:
- How close they're staying to each budget in the spending plan, and how the individual purchases from those budgets come out of their checking account.
- Progress on each loan, and how each loan payment comes out of checking.
- Progress on their savings, their kids' savings, the travel fund, and the rainy-day fund, with the same payment-by-payment view.
- Split payments: buy a fridge for $2,000 on the credit card, choose how many months to split it over, and still see the overall amount and how many payments are left.
One honest note before we start: a couple of these aren't things the app was specifically built for, the food app being one. There's a workaround, but it rests on a few assumptions and judgement calls, so let's put them up front. The steps below show how each one plays out.
- The food app is employer-funded. Buying a gift card spends the work allowance, not your own money.
- There are different types of gift card (a Costco card, a Target card), not one generic card that works everywhere.
- We want the remaining balance per type of card. If one combined total was all we cared about, we'd just enter it as the food app's starting balance and be done. Wanting per-type totals is what steps 2 and 6 are built around.
- The food app is a normal account. That keeps it easy to manage, with card buys and spends sitting alongside your everyday transactions, but it also means its balance counts toward the book total. If you'd rather keep it completely separate, a second book is the cleaner option (more on that at the end of step 6).
Step 1: Set up your book
A book is your top-most organisational unit, and it's locked to a specific currency. In most cases all your day-to-day finances live in a single book; a second book is for something you deliberately want to keep separate, like a holiday or a small side business. You could even start a new book for each financial year.
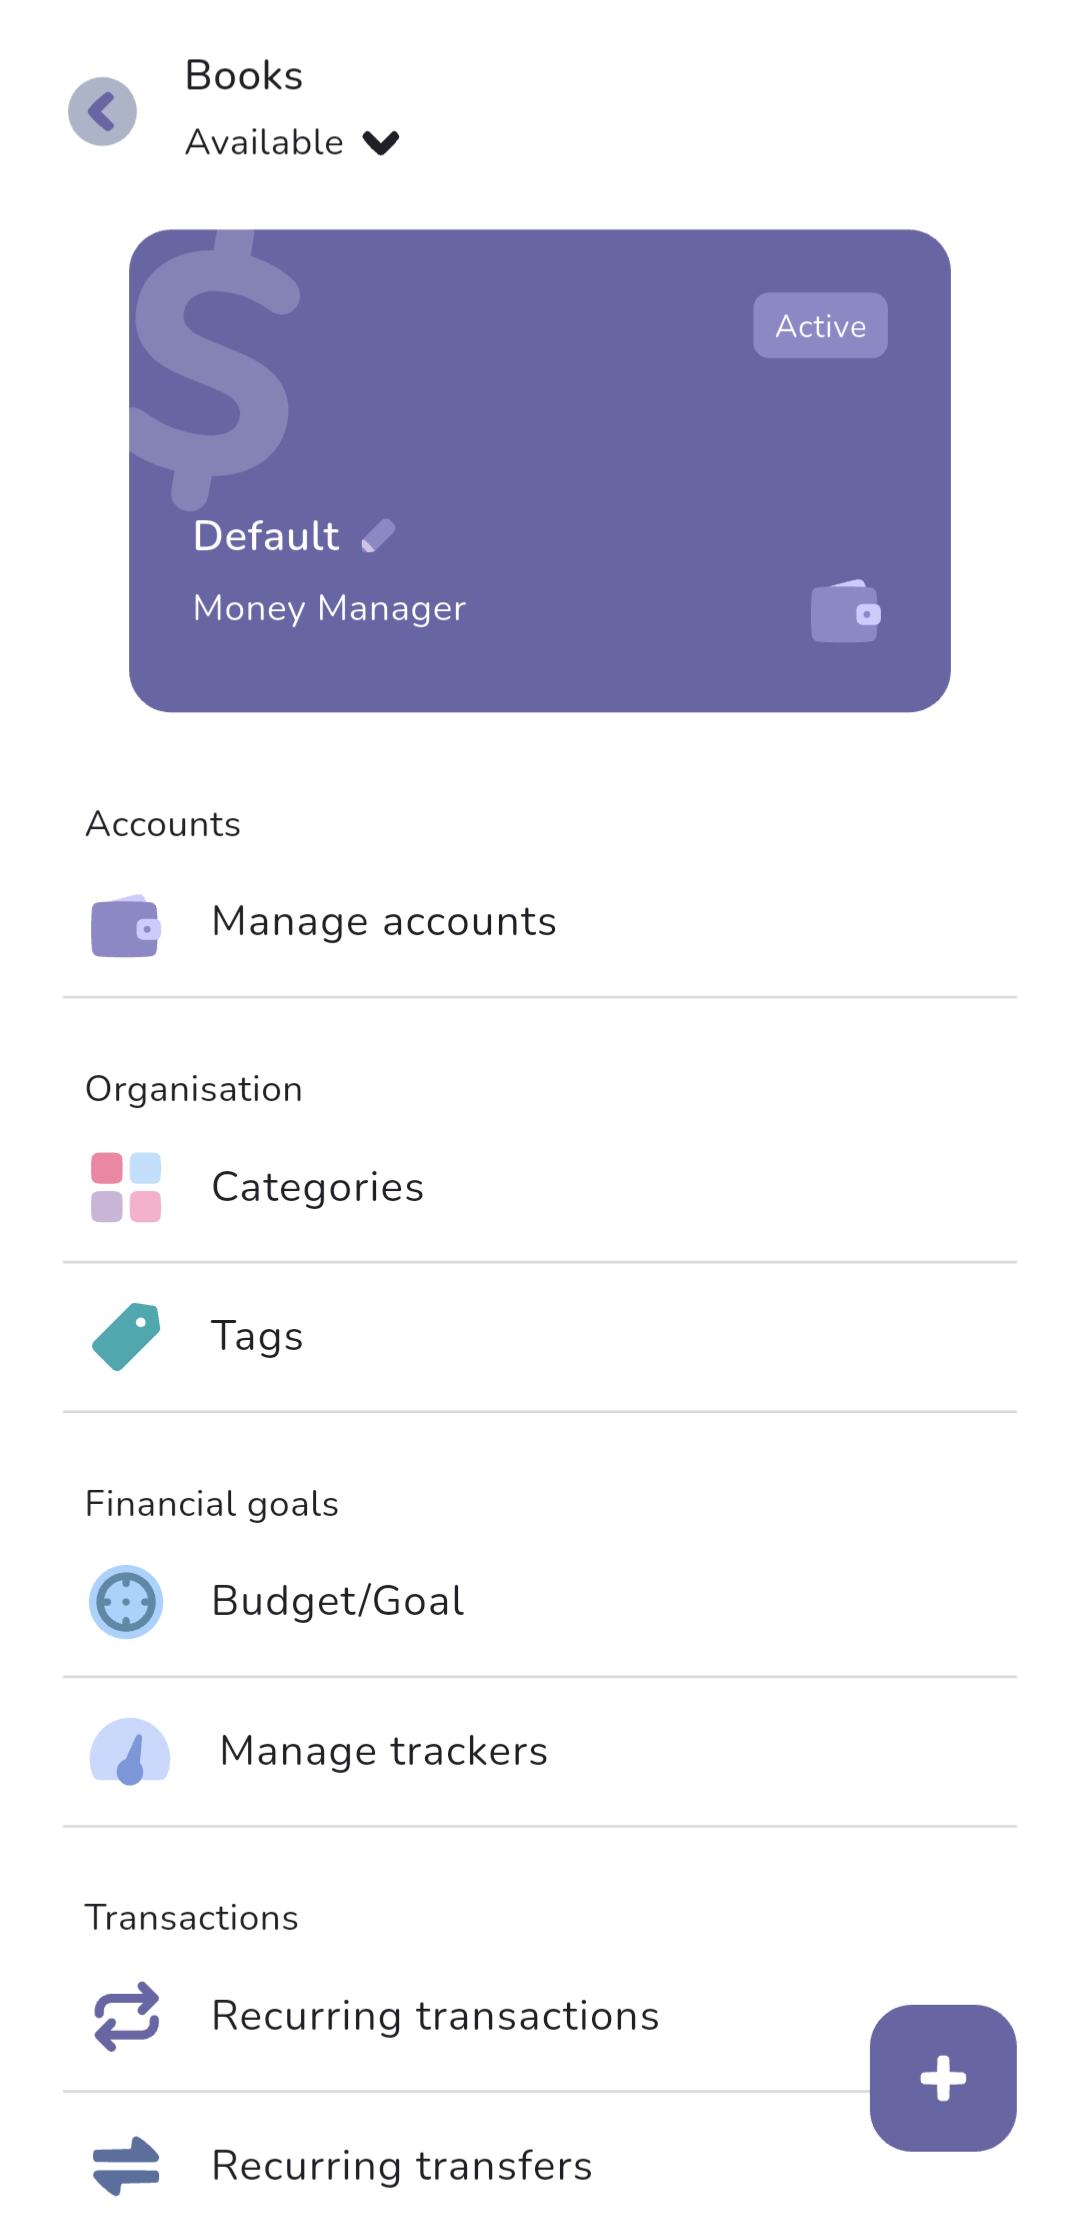
To get to book settings, tap the book icon in the top right. 2 things to get right:
- Book type. This example goes beyond expense tracking. Seeing purchases come out of a checking account means tracking account balances, and the book type for that is Money Manager. A book's type is locked in when it's created; the big purple card tells you which type you're using, either “Money Manager” or “Expense Tracker”. If it says Expense Tracker, create a new Money Manager book with the plus button in the bottom right, and delete the old book if you don't need it.
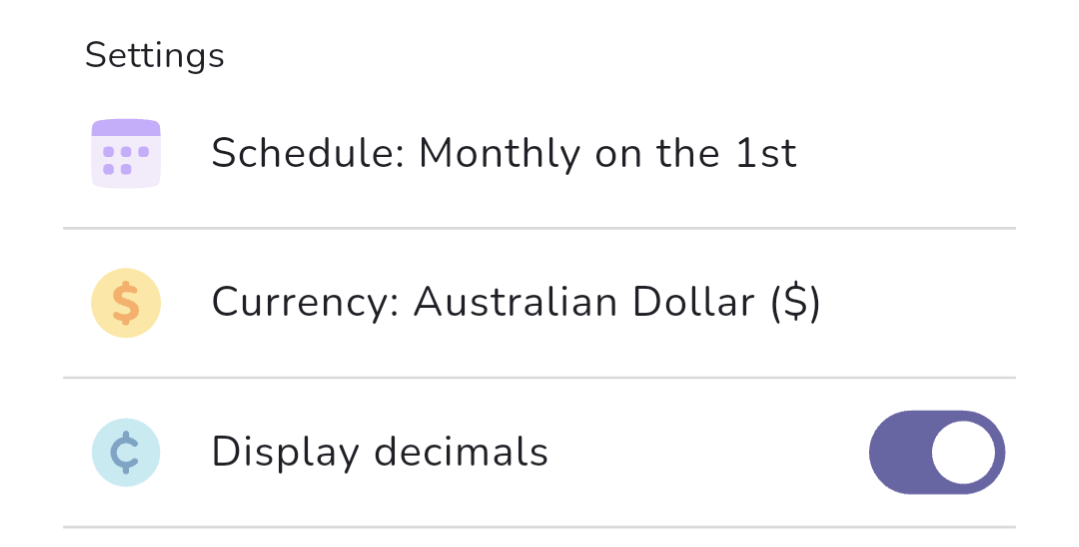
- Schedule. Monthly fits this example best. Under Settings, tap Schedule, choose Monthly, and set the start date to the day you get paid. If pay lands on a slightly different day each month, pick the earliest day it arrives. Lining your budgeting period up with your income makes things a little easier to manage. It's personal preference though; you can use the 1st if you want.
Step 2: Add your accounts
Accounts represent real-life stores of money, like a checking account or a credit card. You can move money between accounts with transfers, which become important in step 8.
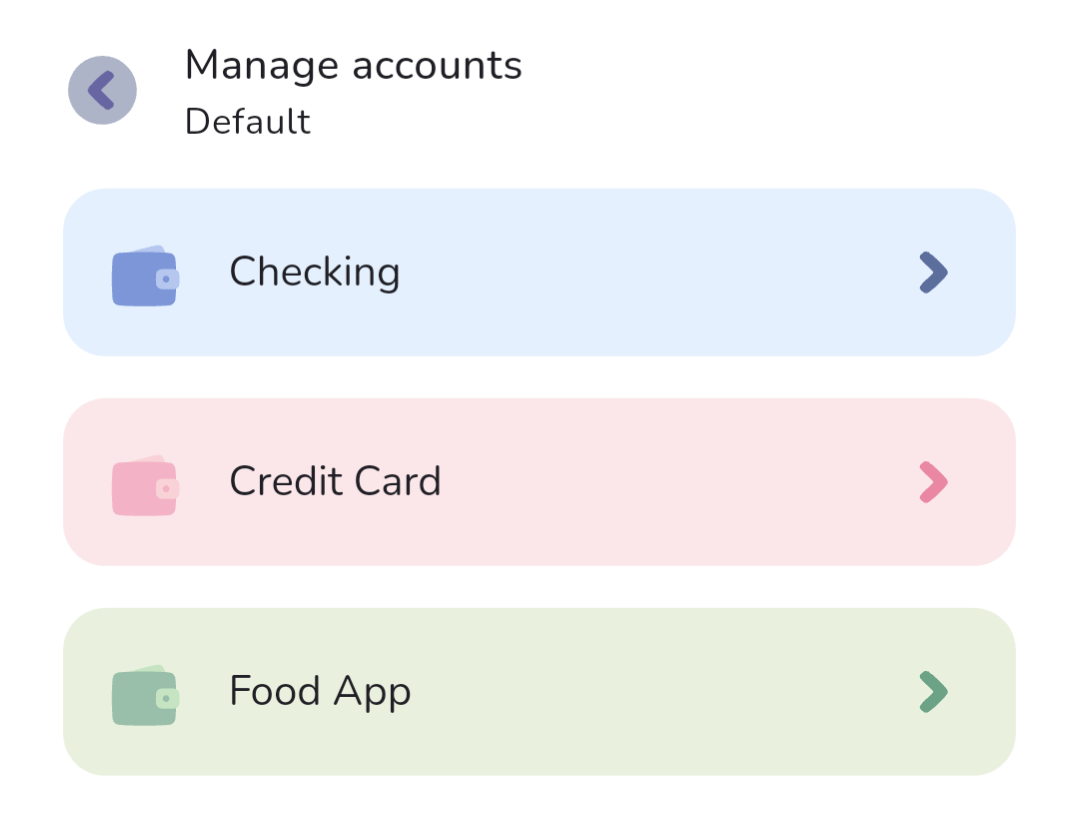
To manage accounts, tap book → Accounts → Manage accounts. I'm assuming manual tracking throughout (see the FAQ below if you'd rather connect your bank). This example needs 3 accounts: checking, credit card, and food app.
- Tap the plus in the bottom right, then manual tracking. Name the account and enter its current balance. The credit card's balance can be negative if there's an outstanding amount on it. For the food app, set the starting balance to 0 (see the assumptions up top; step 6 rebuilds its balance card by card).
- Add any other everyday accounts you use, anywhere you receive money or regularly spend from. But don't add savings or loan accounts yet. Those are next, as trackers.
Step 3: Create trackers for savings and debts
Trackers are like accounts in that they usually map to a real-life source, but they're for money you're not touching day to day: a savings pot with a goal, or a loan you're paying down. You can't spend from a tracker; money moves in and out via transfers only. That mirrors how these accounts tend to work in real life (at least with the banks we know in Australia and New Zealand): you can only transfer in and out, and transferring money into a loan is paying it off. If you need to spend from it, it should be an account instead.
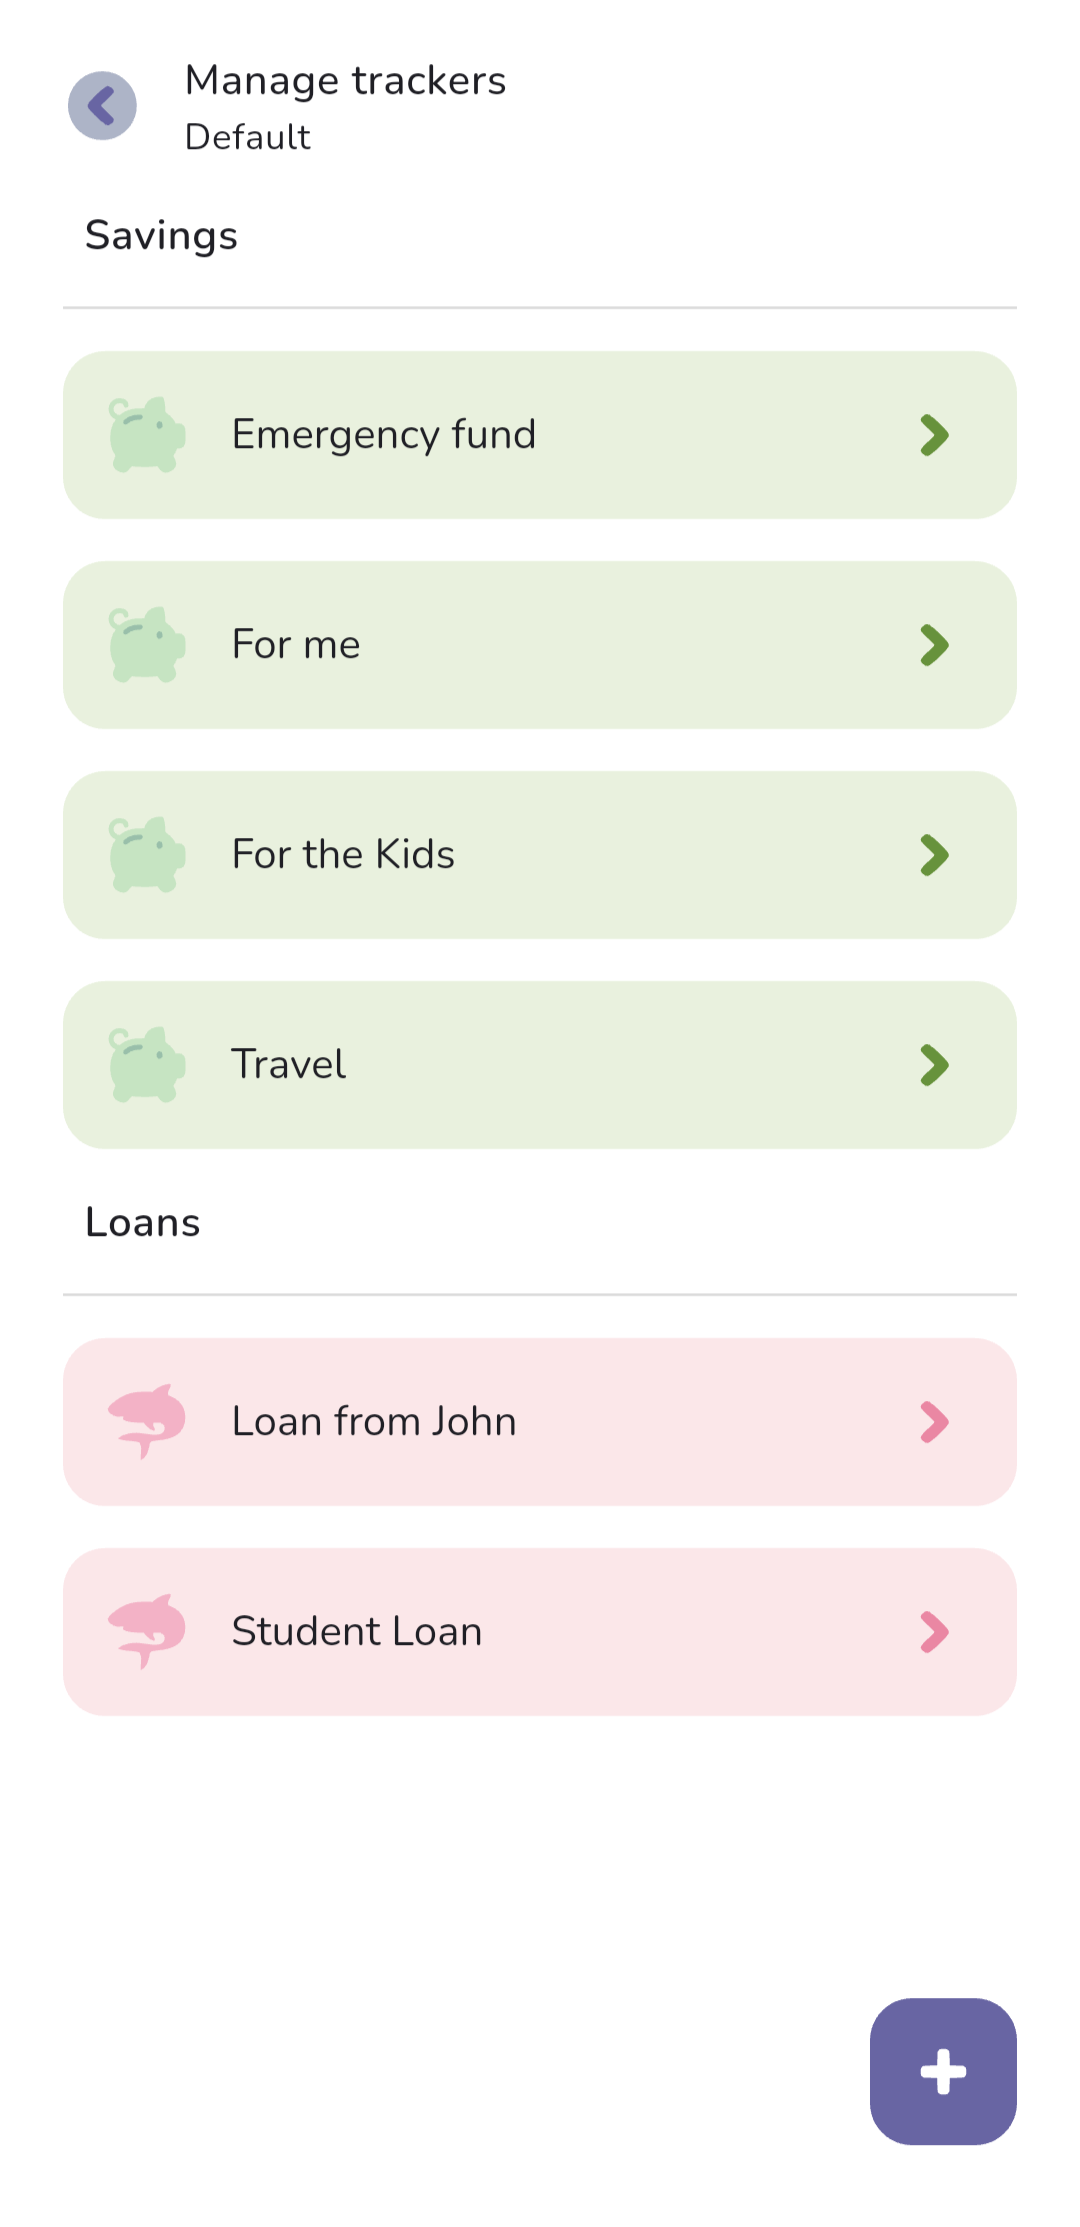
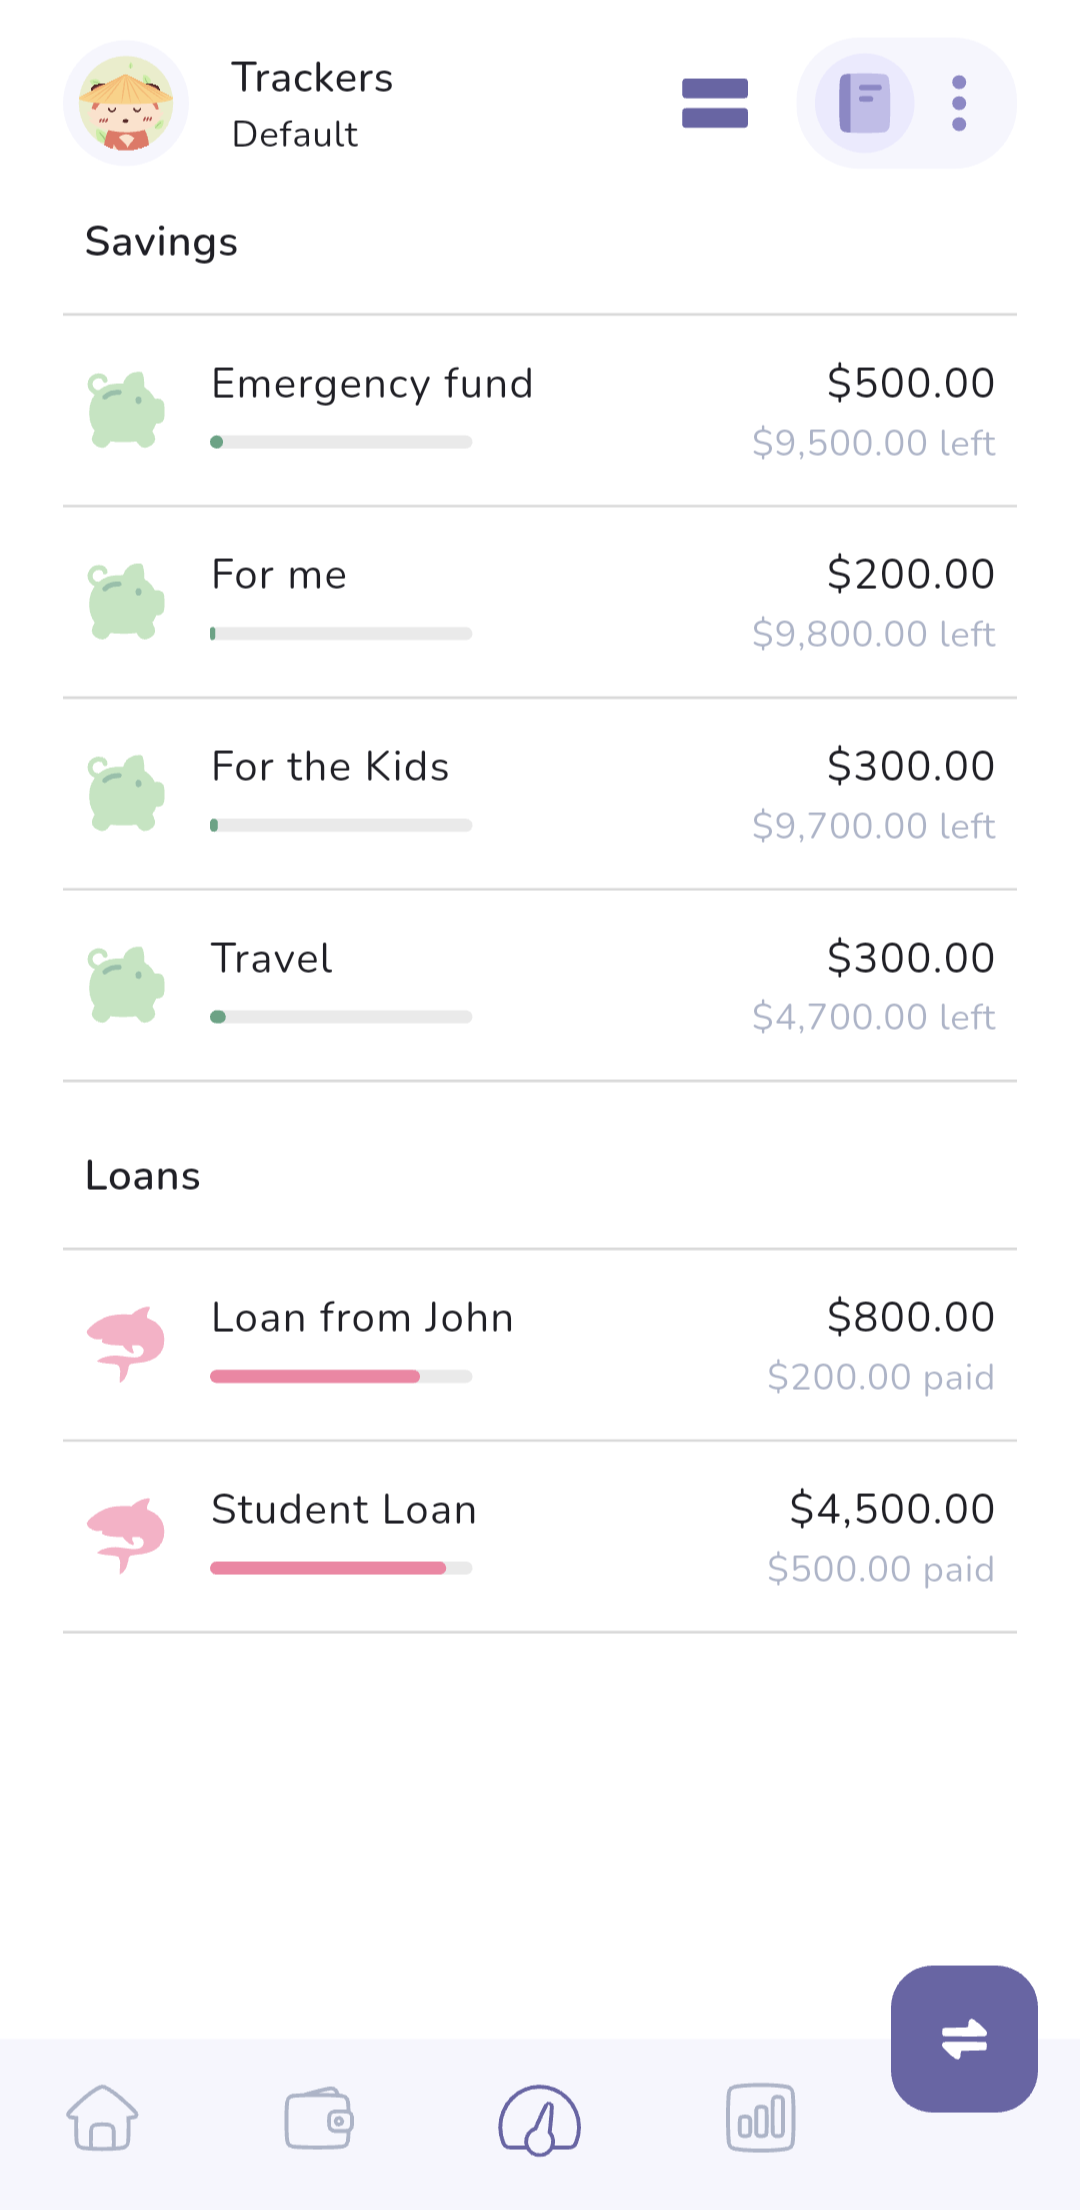
To manage trackers, tap book → Financial goals → Manage trackers. Tap the plus in the bottom right to create one. For this example, 4 savings trackers:
- For me (personal savings)
- For the Kids
- Travel
- Emergency fund (the rainy-day money, under another common name)
Take your best guess at a goal for each; the numbers are easy to change later. Then the loan trackers:
- One per friend you owe (Loan from John, say)
- Student Loan, for the government debt (a tax bill you're paying off works the same way)
For loans, enter the original amount and how much you've already paid off, or set paid-off to 0 and enter your current balance as the loan amount. Either works.
Step 4: Categories
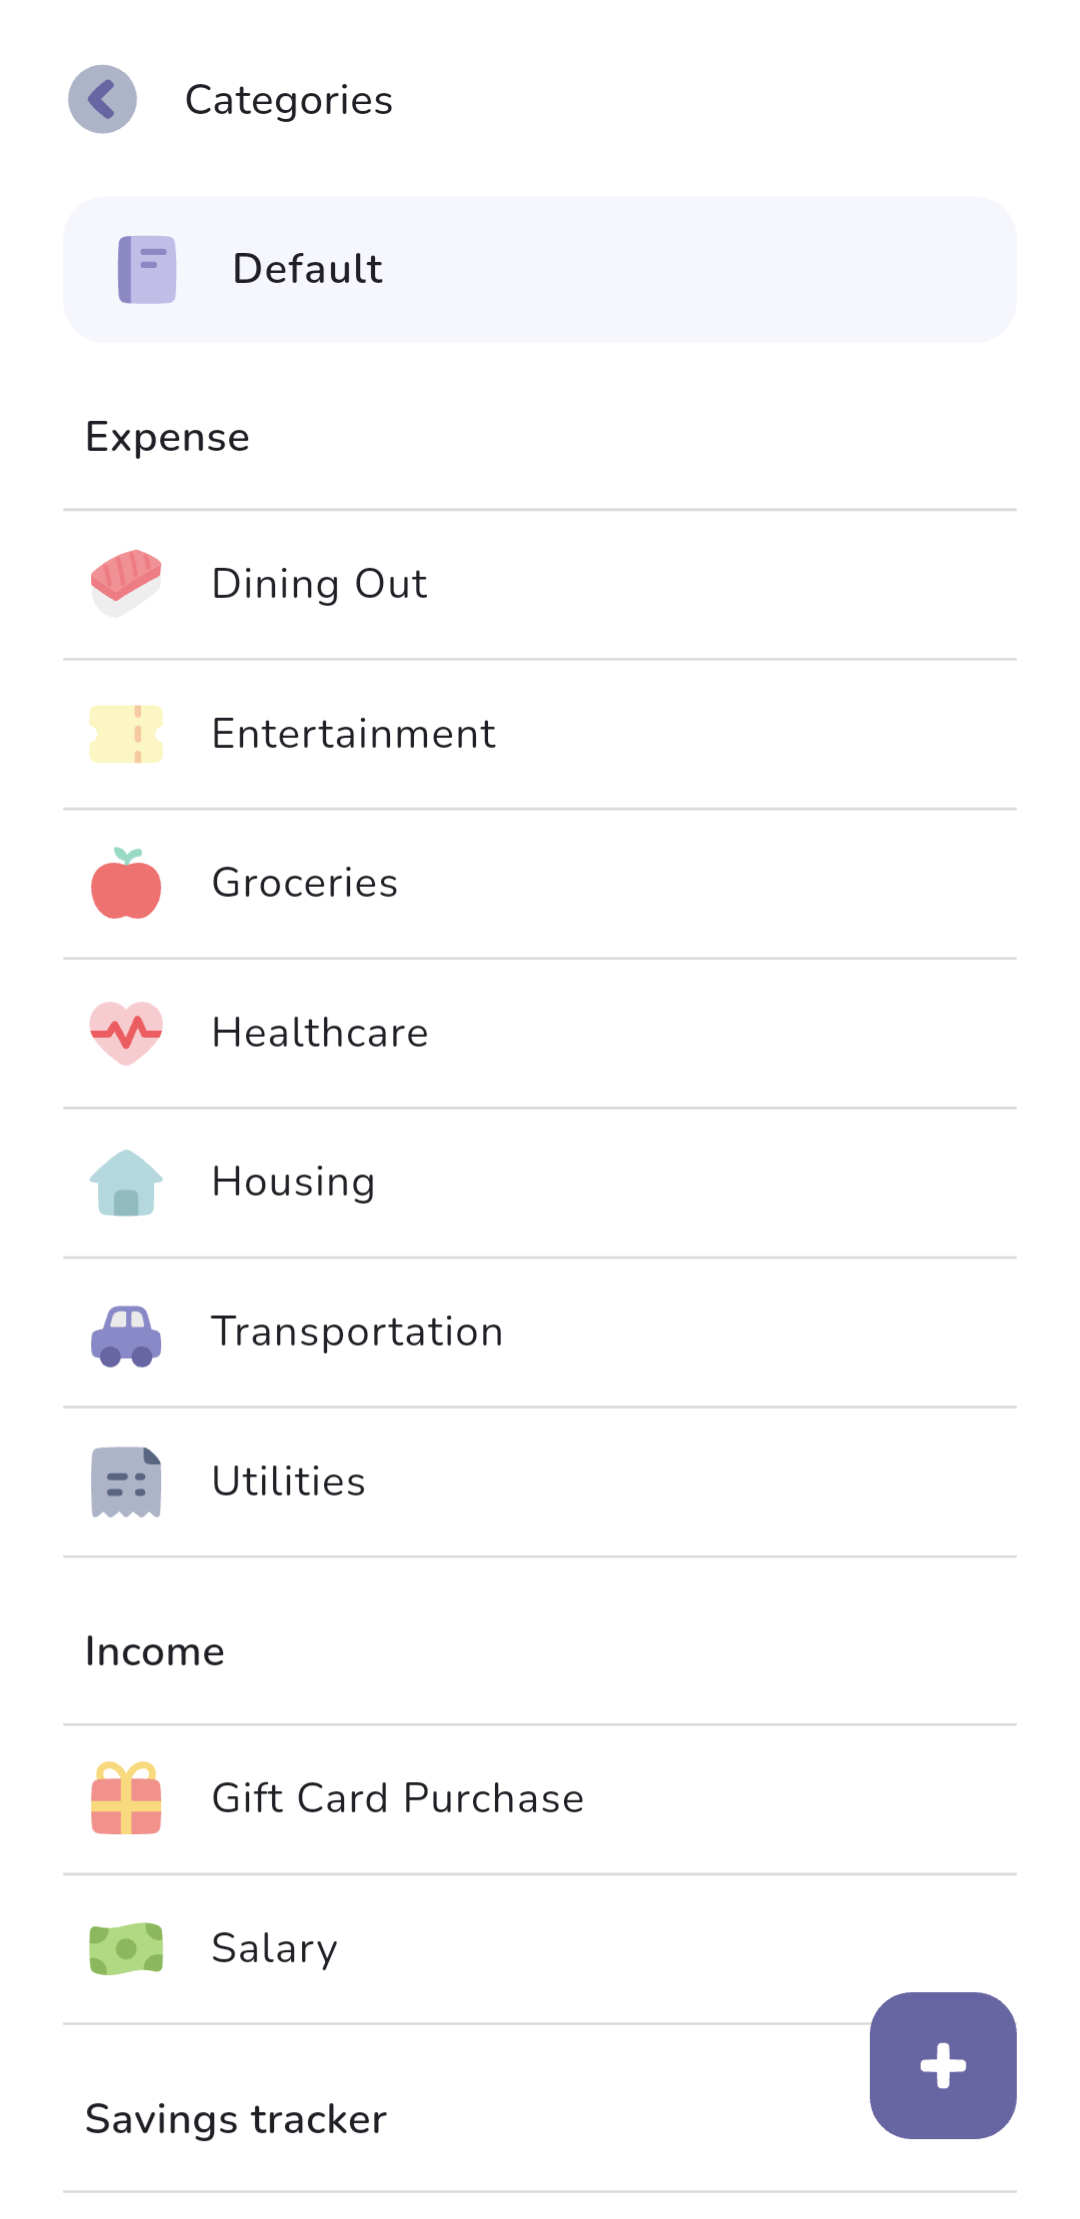
Categories are how spending and income get grouped, and they're what budgets attach to. To get to them, tap book → Organisation → Categories.
- This example budgets against Groceries, Gas, Eating out, Entertainment, and Subscriptions. Several exist by default, and there's no need to set up every category you might ever need now: you can create one on the spot whenever you're adding a transaction and nothing fits.
- Create one special income category: Gift Card Purchase, with Include in overall goal unticked: the gift cards are employer-funded, so they shouldn't count toward your income goals. This one's for the food app, and it'll make sense in step 6.
Step 5: Turn the spending plan into budgets
Here's the mental model that makes this spending plan click: it splits into 2 halves. The spending half (groceries, gas, eating out, entertainment, subscriptions) is handled by category budgets. The setting-aside half (savings, travel, emergency fund, loan and debt payments) is handled by trackers and transfers (steps 3 and 8). Budgets watch what you spend; trackers watch what you keep.
That's why the overall budget shouldn't be your full income. Say your salary is $5,000 a month and the plan sends $1,000 of it to savings and debt payments. The overall budget is the $4,000 that's actually available to spend.
To set it up, tap book → Financial goals → Budget/Goal:
- Set the overall budget ($4,000 in our example).
- Tick Set category budget.
- Allocate across your categories: groceries, gas, eating out, entertainment, subscriptions. The category amounts don't need to add up to the overall figure.
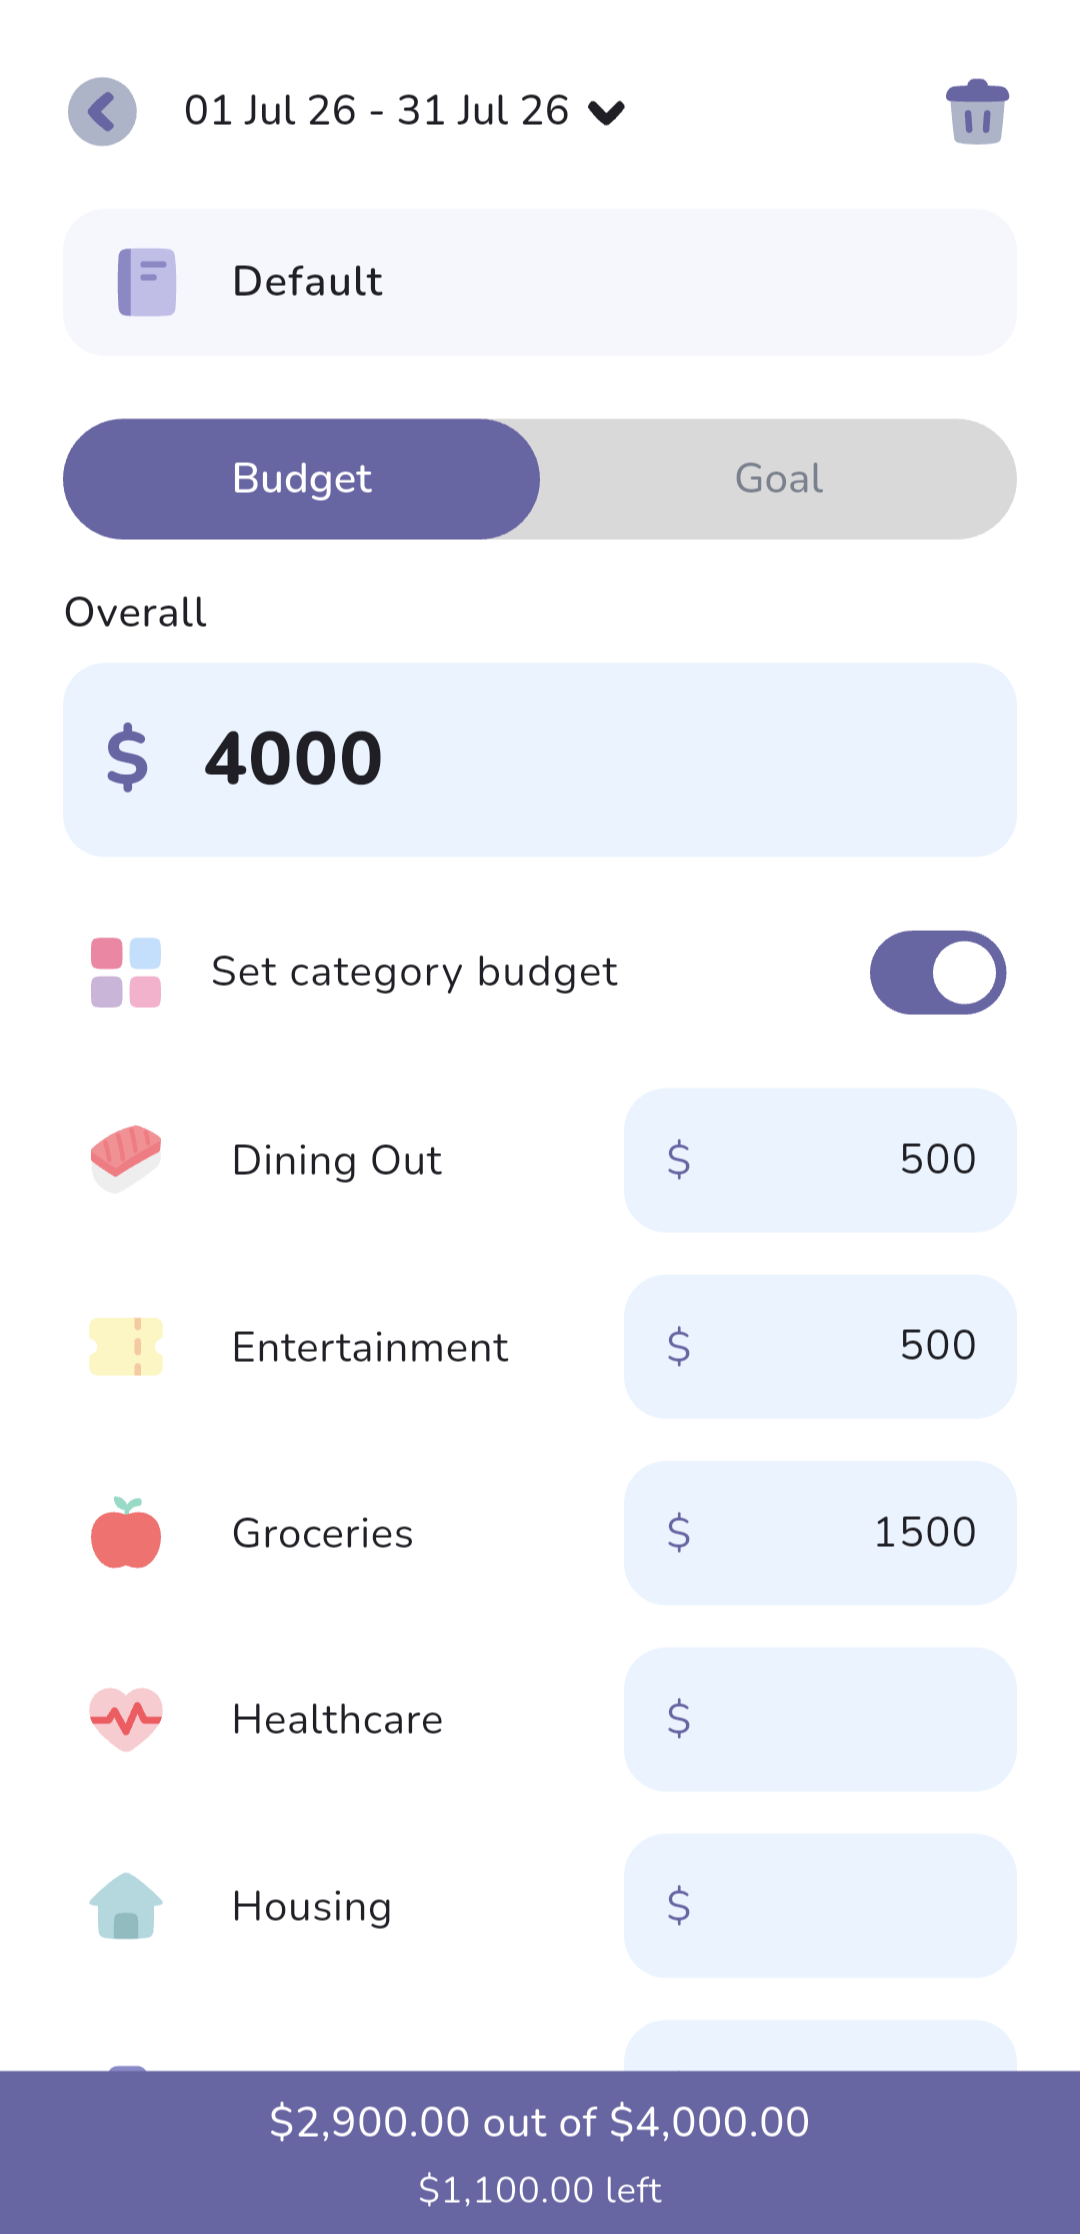
One thing the dates in the top left give away: a budget belongs to a specific budgeting period, so you can change the numbers from month to month. Each new month starts using last month's budget and the end-of-period summary can adjust the new one for you, rolling last month's overspend or leftover into it. Goals, the other tab on this screen, reset each period in exactly the same way; the one difference is that only budgets can roll over from the previous month.
One setting makes or breaks our budget math. Transfers to and from savings trackers aren't counted as expenses or income: you're moving money to yourself, so they leave your budget alone. Loan payments are the ones to watch. Transfers into trackers get special categories, under the Savings tracker and Loan tracker sections of book → Organisation → Categories. Each category has an Include in overall budget checkbox. Loans repaid comes ticked by default, so untick it for this setup: the debt payments shouldn't eat into our $4,000 budget that was worked out without them. Tick it instead if you'd rather one figure cover everything, but then set the overall budget to your full income minus savings.
For what it's worth, Natalie and I keep our mortgage repayments and other fixed monthly payments out of our budget. We find it much easier to manage that way.
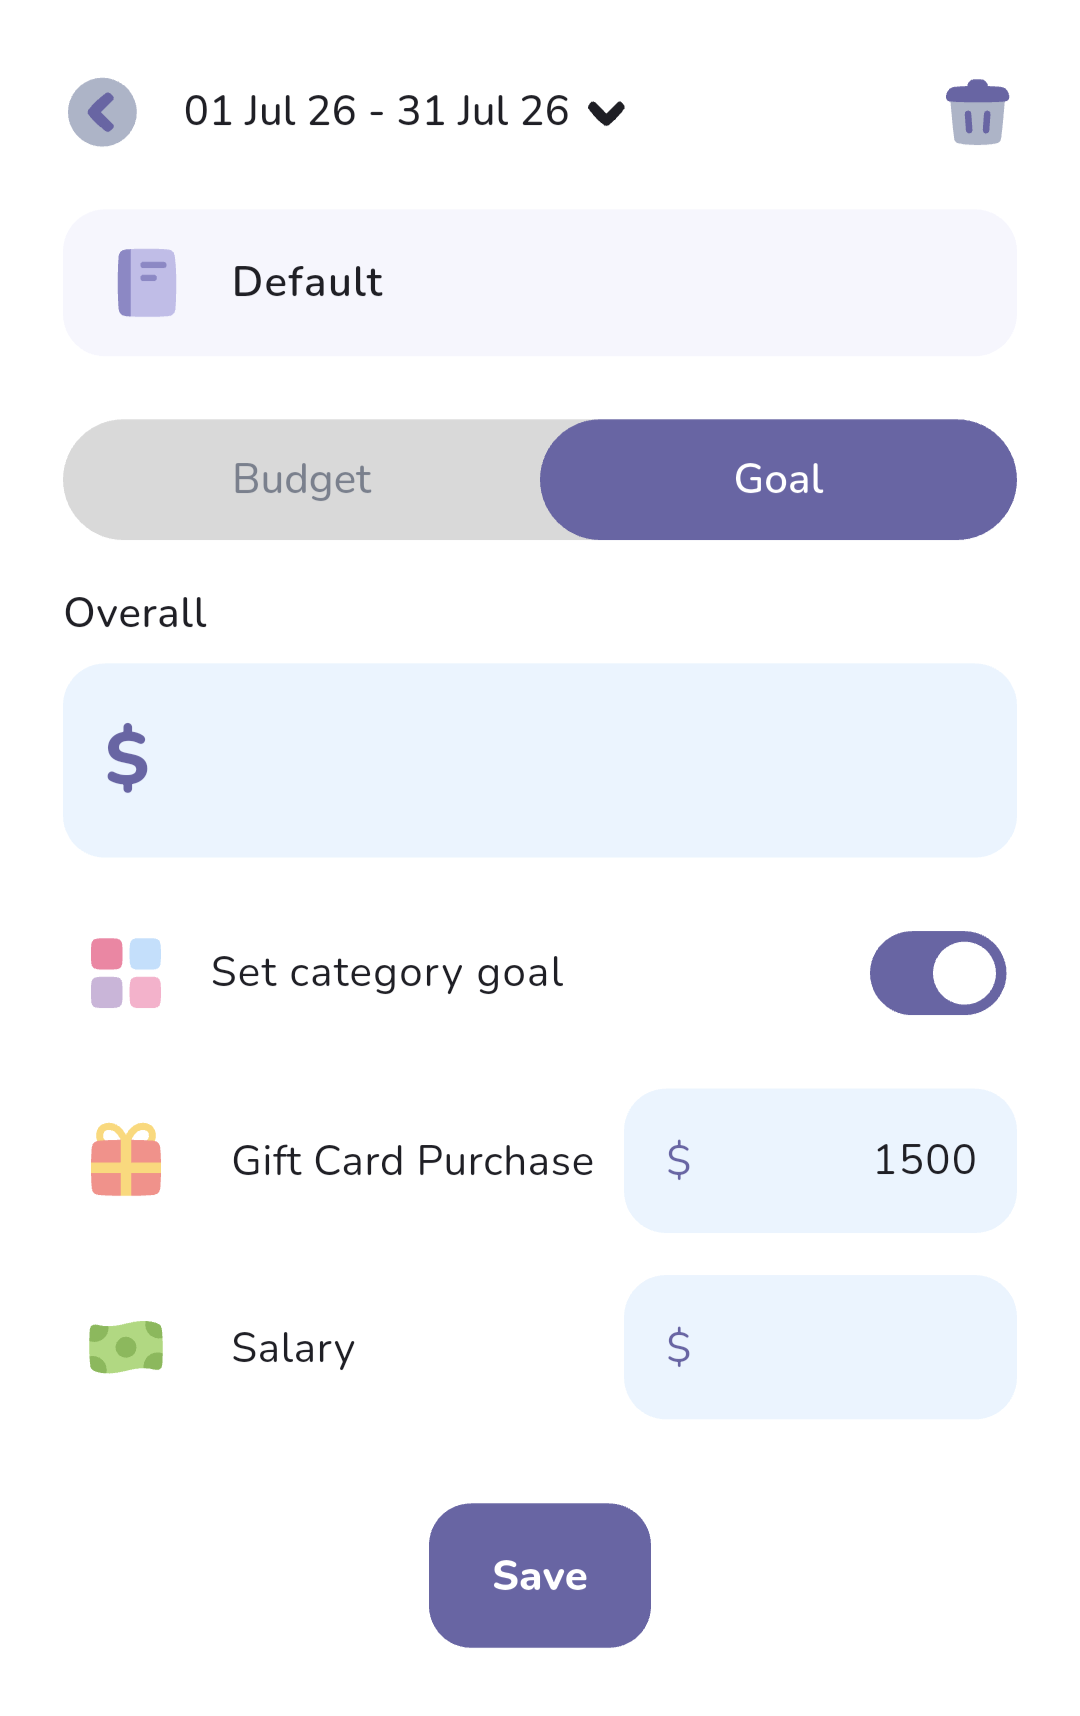
One last thing to do on this screen: add a goal. The food app allowance resets every month and doesn't roll over, which is exactly how a category goal behaves. So we'll use one as the gift-card buying limit:
- Tap Goal.
- Tick Set category goal.
- Set the Gift Card Purchase category to your monthly allowance, and save.
Step 6: The food app and gift cards
This is the tricky one, and where the assumptions from the top of the post come in. The workaround that makes it all fit is tags.
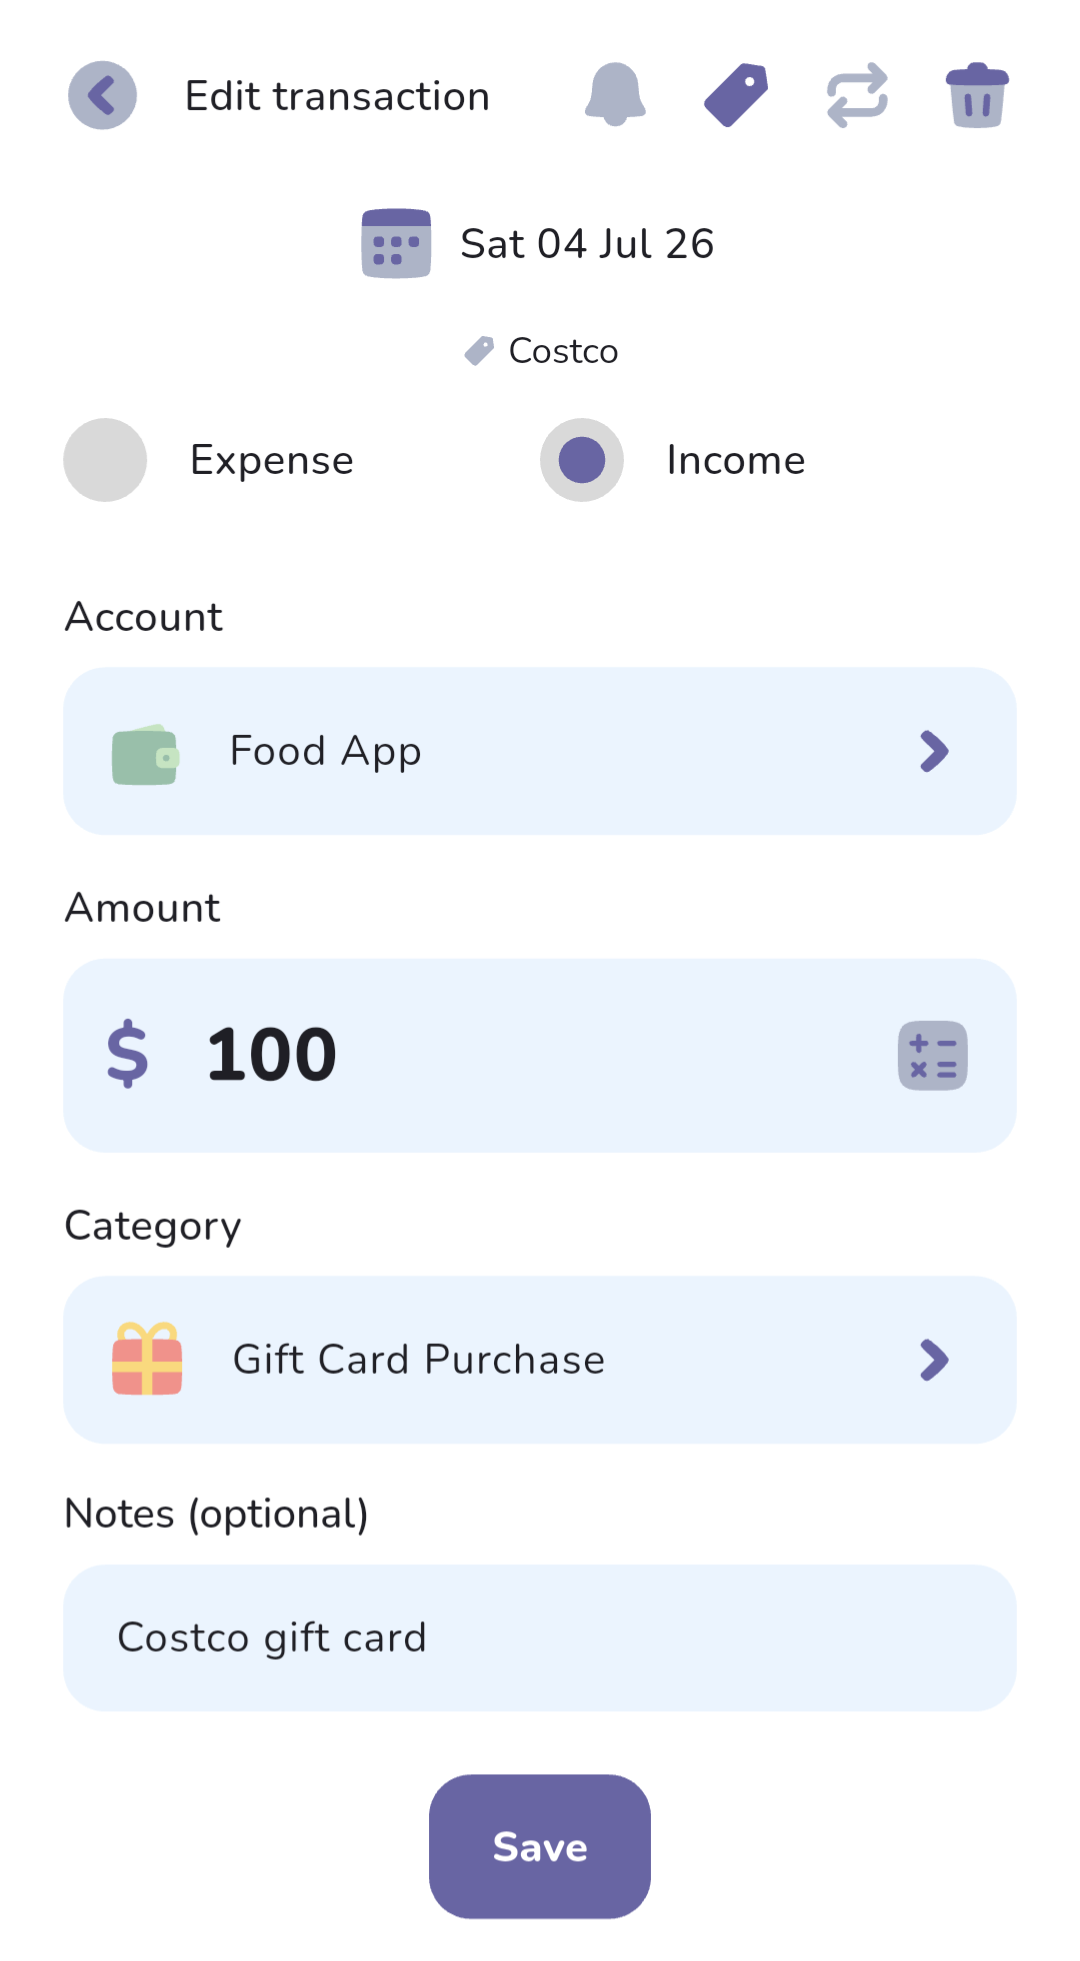
Buying a card is recorded as income to the food app account, tagged with the card type. Say you bought $100 of Costco cards this month:
- On the home screen, tap the add-transaction button (plus icon, bottom right), then Income.
- Select the Food App account and enter $100.
- Category: Gift Card Purchase (the income category from step 4).
- Tap the tag icon (top right), create a tag named Costco, make sure it's ticked, and tap Apply.
- Optionally add a note (“Costco gift card”), then save.
Do the same for each card type you hold, and again every time you buy a card from now on.
Cards you already had before this month shouldn't eat into this month's goal, so enter their combined per-type totals the same way but back-dated to last month. If your older Costco cards total $500, that's a $500 income transaction dated last month.
Spending a card is an expense on the food app account with the same tag. For the category you've got a choice: use the real category (Groceries, say) if you want gift-card spending to count in your budget, or create a dedicated “Gift Card Spend” category if you'd rather keep it out.
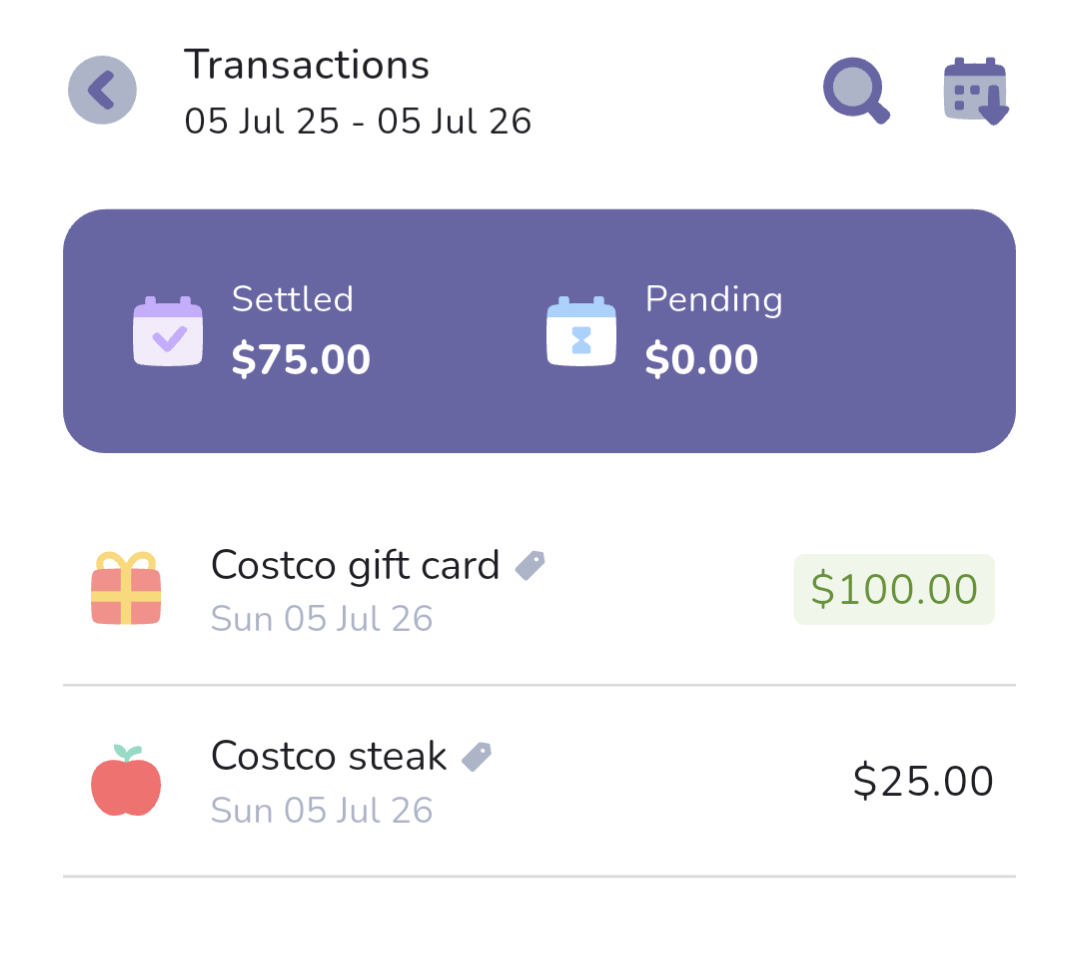
With that in place, the food app account's balance is always the total left across all your cards. To see one card type on its own, use search:
- Go to the accounts screen (wallet icon, second from the left in the bottom nav bar) and tap the magnifying glass at the top.
- Tick both expense and income.
- Tap into Tags, pick the card's tag, and apply.
- Widen or narrow the date range if you need to (it defaults to the last year), then tap Search.
- The purple box at the top shows 2 totals, settled and pending, each worked out as income minus expenses. With this filter, settled is that card type's remaining balance: card buys minus card spends.
One honest limitation to flag: this person wanted the food app visible but not counted in their main book's numbers, and right now the app can't do that. Every account's balance counts toward the book total, the food app included. If that bothers you, the workaround is a second book just for the food app: visible any time by switching books, invisible to your main book's totals. Otherwise, accept the wrinkle and know your book total runs a little high by whatever your cards are worth.
Step 7: Salary, subscriptions, and other regular transactions
Now the plan starts running itself. Recurring transactions cover the regular income and expenses on your everyday accounts: the salary landing in checking, each subscription hitting whichever account it charges.
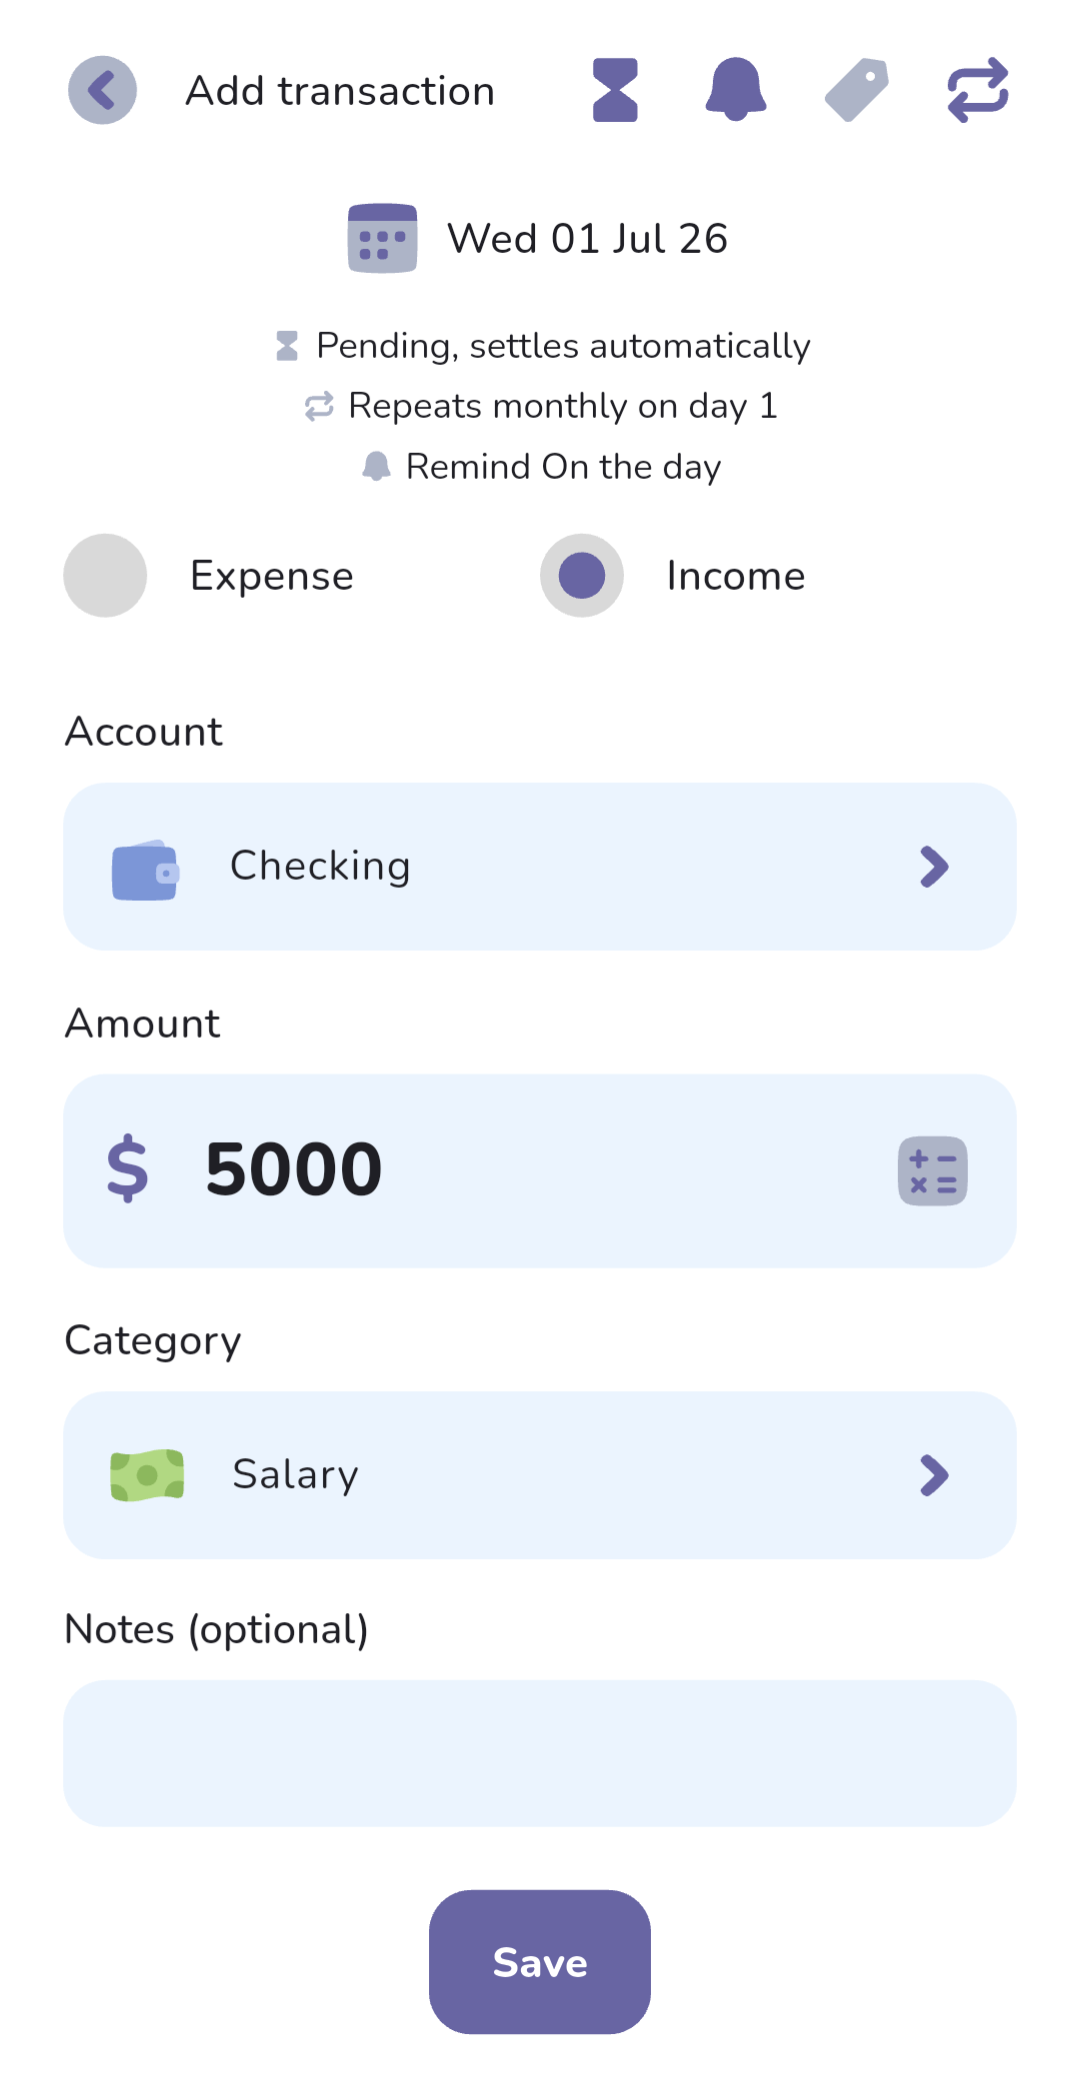
To set one up (the salary, say), add a normal transaction from the home screen, then:
- Fill in the usual details: income, checking account, amount.
- Tap the recurring button (double-arrow icon, top right) and set how it repeats.
- Choose the pending behaviour with the hourglass icon: Pending, settles automatically for payments that happen on their own, or Pending if you want each one to wait for you to confirm it, a handy nudge to check the salary actually landed. (More on how pending works in our pending transactions post.)
- Optionally tap the bell icon to get a notification when it's coming up.
Set up each subscription the same way, categorised as Subscriptions; the category budget from step 5 then keeps an eye on the monthly total for you.
One-off future transactions work too: same steps, just with a future date and no repeat. Car service booked for next month? Put it in now: pending, with a reminder if you like.
Step 8: Loan payments and savings on autopilot
Same idea, but with transfers (because transfers are how money moves into and out of trackers). This is the step that connects “the payment left my checking account” with “the loan went down”: one recurring transfer does both.
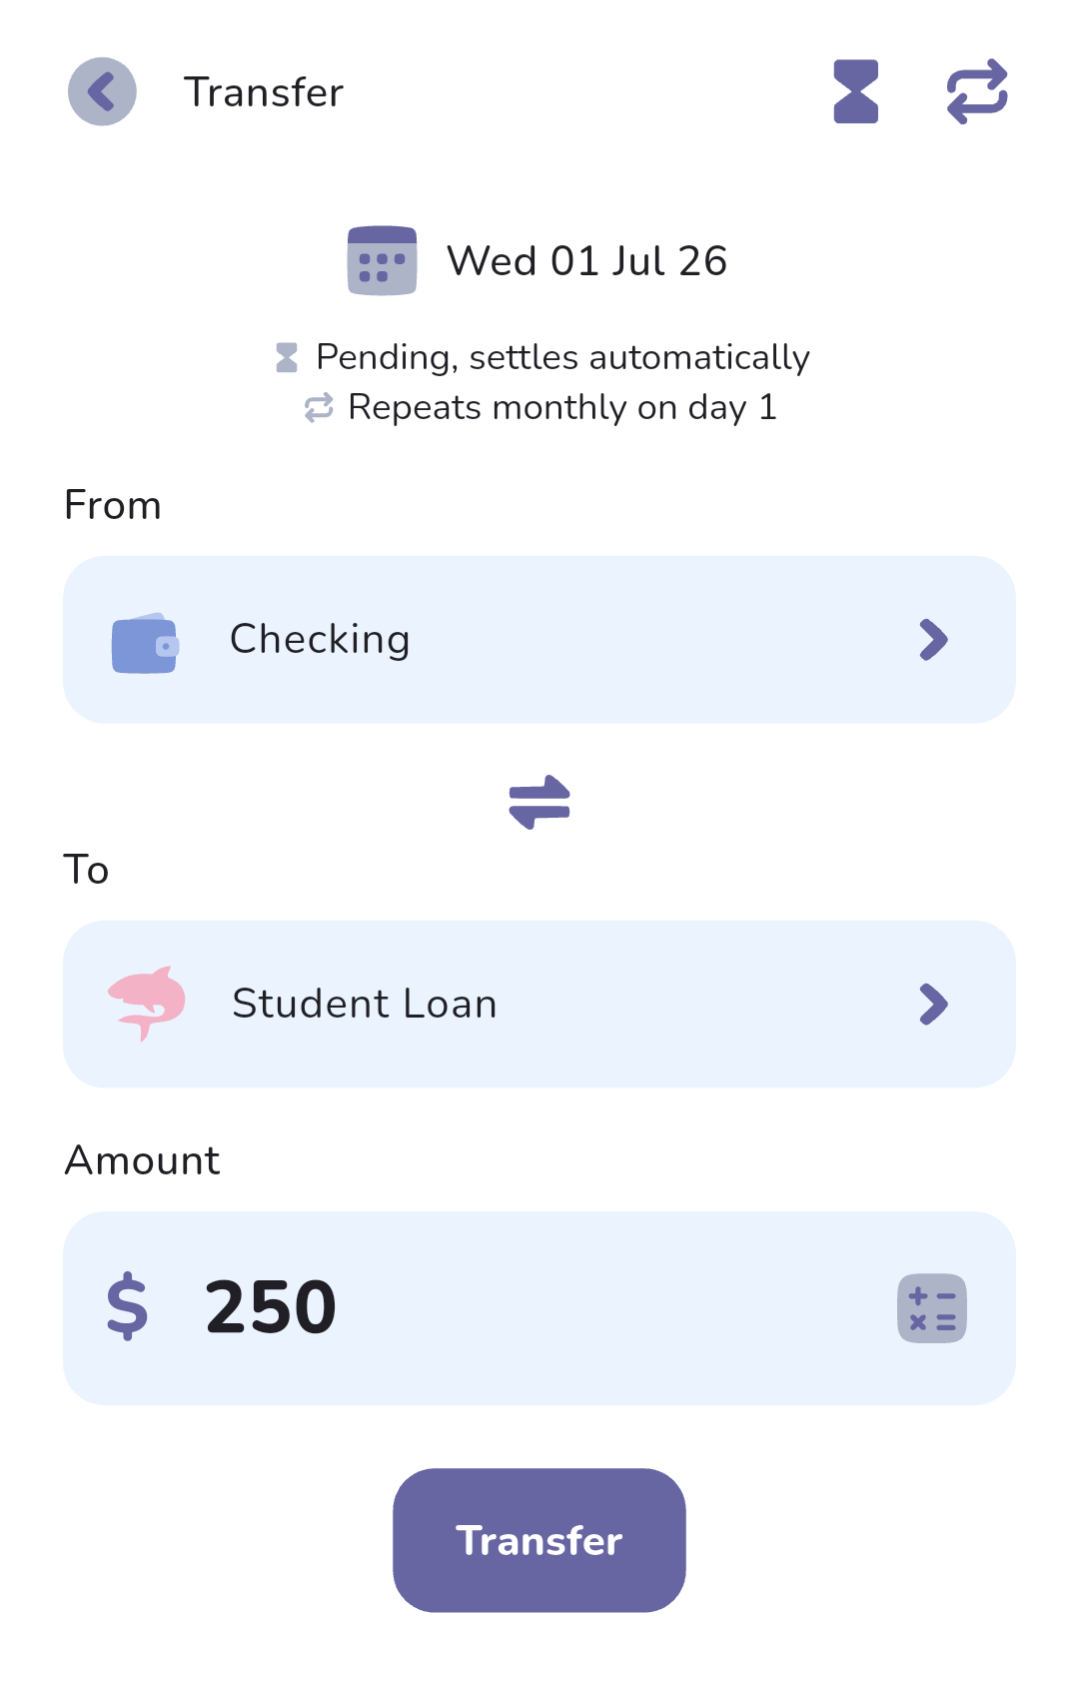
Here's the monthly government-debt payment, paid from checking:
- On the accounts screen, tap the transfer button in the bottom right.
- From: checking. To: Trackers → Student Loan (our government-debt tracker). Enter the amount.
- Tap the recurring button and set it to monthly.
- Pending behaviour: Pending, settles automatically (it's an automatic payment).
Repeat for each regular payment to a friend, and for the fixed amounts going to personal savings, the kids' savings, and travel. Just like transactions, one-off future transfers work here too if something isn't regular enough to recur.
If the government debt is garnished from your pay (taken out before the salary ever lands), enter your full pay as the income in step 7, then add a transfer from checking to the government debt tracker for the garnished amount each pay. Checking nets out to what actually arrived, and the tracker stays up to date. Not tracking that debt? Skip the recurring transfer and just enter the salary that hits your account.
Rainy-day money was described as “whatever's left after everything else comes out”. That works fine here; it's just manual rather than recurring. At the end of each month, transfer whatever's left in checking (above whatever buffer you like to keep) into the emergency fund.
Step 9: Spending from savings
When it's time to actually use saved money, it goes back the way it came: spend from a normal account, then cover it with a transfer out of the tracker. Buying a plane ticket? Record the expense on checking or the credit card as usual, then transfer the same amount out of the Travel tracker to cover it.
Step 10: Interest, fees, and other adjustments
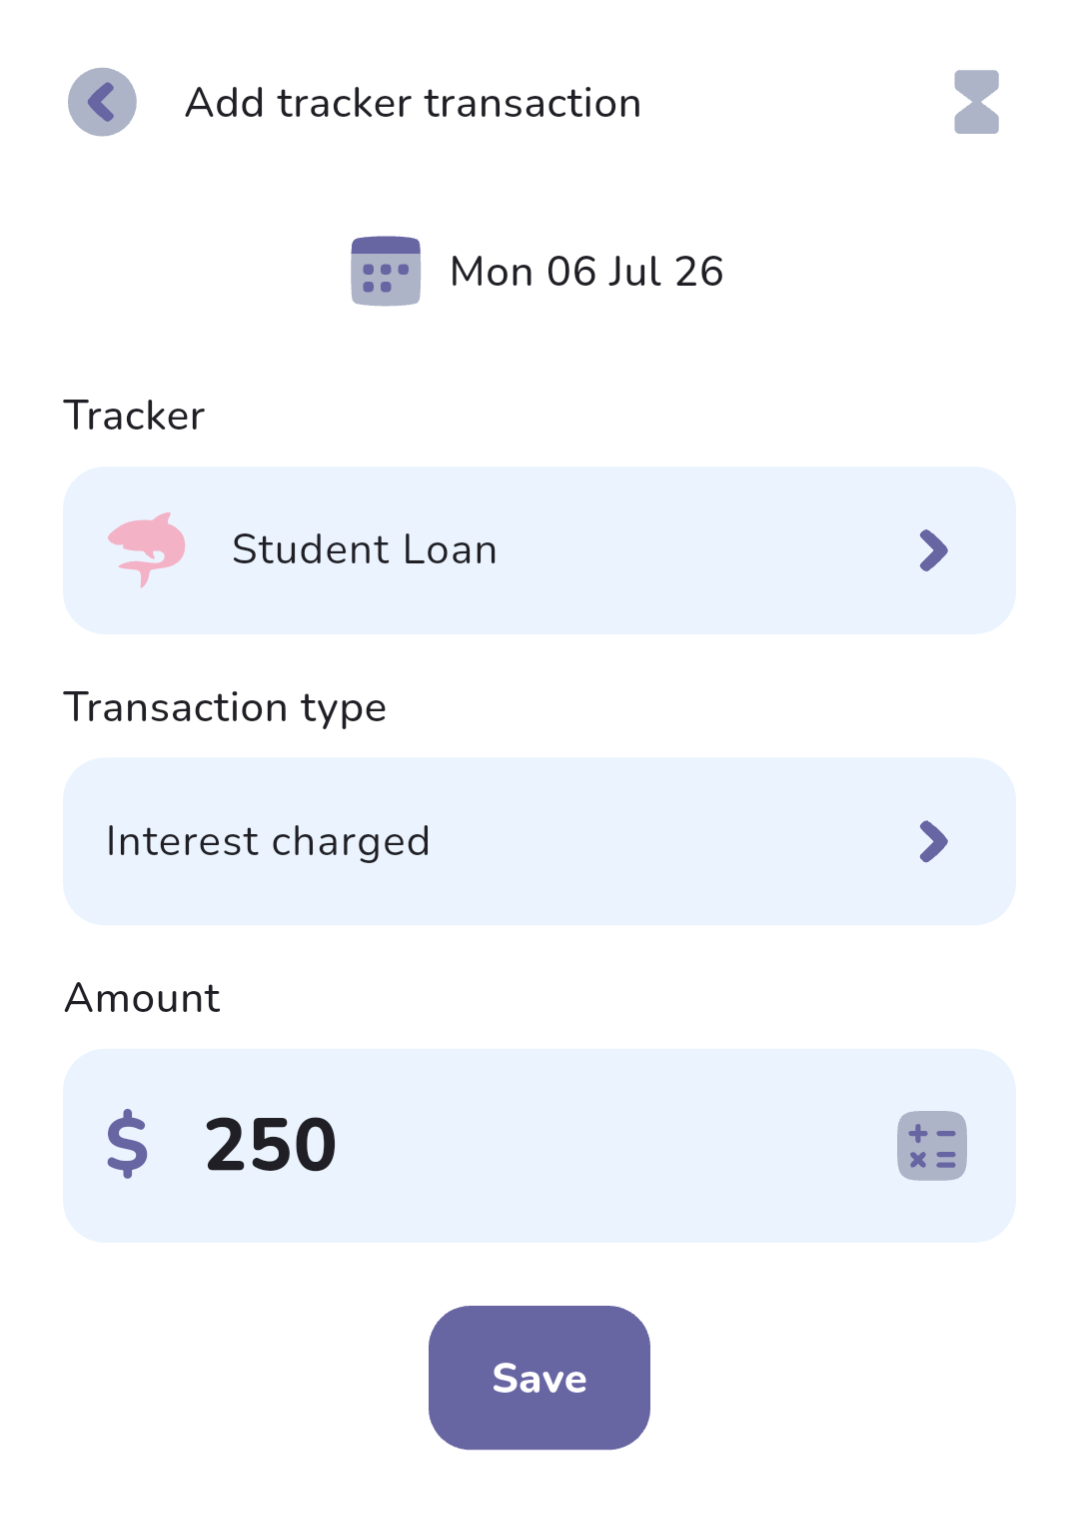
If your trackers map to real accounts, their balances will drift from what the app shows: savings earn interest, loans accrue it, some accounts charge fees. Tracker transactions handle these without pretending money moved from one of your own accounts.
- Go to the trackers screen (the gauge icon in the middle of the bottom nav bar) and tap into the tracker.
- Tap Add entry, fill in the details, and save.
A quick correction entry whenever a statement arrives keeps each tracker honest against the real account.
The fridge problem: split payments
One question from the email deserves its own section: “I buy a fridge for $2,000 and choose how many months I want to split the payment over. It goes on my credit card, but I still want to see the overall amount and how many payments are left.”
We don't have a purpose-built instalments feature (not yet, though making split payments easier is on our project board). Here's the setup that gets you closest, 2 ways, depending on how closely you want to watch it:
- Just the payments: a recurring transaction on the credit card ($200 monthly, categorised however you budget appliances) with “Fridge, 10 payments” in the note so every occurrence is self-explanatory in your history. One thing to know: recurring transactions run on a frequency and an end date, not a payment count, so work out when the 10th payment lands and set the end date there.
- The payments and the progress: for a big purchase you want to keep a close eye on, you can treat it like the loans in steps 3 and 8. Create a loan tracker called Fridge with the full $2,000, then pay it down with transfers from the credit card: a recurring $200 monthly transfer with that same end date, or one-off future transfers if the schedule is irregular. The tracker shows the amount remaining at a glance, and every payment in its history.
Where to look once it's running
Back to the list of things this person wanted to see. Here's where each one lives now.
- “How close am I staying to each budget?” The home screen shows the month's overall and category budgets filling up as you add transactions.
- “The individual purchases coming out of checking.” Accounts screen → tap the account.
- “Progress on my loans, and each payment coming out of checking.” Trackers screen → tap the loan. You'll see how much you've paid off, how much is left, and every transfer in and out, each one showing which account it came from.
- “Progress on my savings, my kids' savings, travel, and rainy-day fund.” Same as the above, but on each savings tracker.
- “Split payments.” The fridge section above.
A few common questions
What's the difference between an account and a tracker?
Accounts are for money you spend from day to day: your checking account, your credit card. Trackers are for money with a goal attached: savings you're building up or a loan you're paying down. You can't spend directly from a tracker; money moves in and out via transfers, which is how most real savings and loan accounts behave anyway.
Do I have to enter everything manually?
No. This walkthrough assumes manual tracking so it works for everyone, but if you're in Australia, the US, or Canada you can connect your bank and have transactions come in automatically. The structure (book, accounts, trackers, categories, budgets) stays exactly the same.
Why does the food app account start at zero?
Because its balance gets rebuilt from your gift-card transactions. Every card you buy is recorded as income to that account and every spend comes out of it, so the account balance always equals the total remaining across all your gift cards.
Does money I move to savings or loan payments count as spending in my budget?
Savings transfers don't: moving money into a savings tracker isn't an expense, because you're moving money to yourself. Loan payments are up to you. They get a special category (Loans repaid) with an "Include in overall budget" checkbox in the Categories screen, ticked by default; this walkthrough unticks it, which is why the overall budget is income minus the planned transfers. Budgets watch your spending, trackers watch your saving and debt. Leave it ticked if you'd rather budget one figure that covers everything.
Can I change the budgets and goals later?
Yes, any time. Budgets, goals, and tracker targets aren't locked in; most people tweak their numbers over the first couple of months until the plan matches reality. Start with a best guess rather than waiting for perfect numbers.
In short
The shape of the whole setup: accounts for money you touch every day, trackers for money with a goal or a debt attached, categories and budgets for the spending half of the plan, recurring transactions and transfers to make it run itself, and tags for the odd thing that doesn't fit neatly.
Each of these has its own page in our user guide, starting with accounts and trackers.
This post came straight out of one person's email, and honestly it's the most useful kind of post we can write. If you're having trouble fitting the app around your finances, drop us an email at hello@thebudgeting.app. Emails like that shape where the app goes next, and yours might just become the next walkthrough.
Cheers,
Jeremy